Electromagnetic imaging technology with array sensors is used extensively to detect defects in industries where structural integrity and safety are critical, such as aerospace, high-speed railway, pressure vessels, energy facilities and precision manufacturing. SIST Assistant Professor Ye Chaofeng and his research group in the Precision Sensing and Intelligent Testing lab (PSIT) have designed two novel probes and testing systems for the imaging of defects. Both achievements were recently published in the IEEE Transactions on Industrial Electronics.
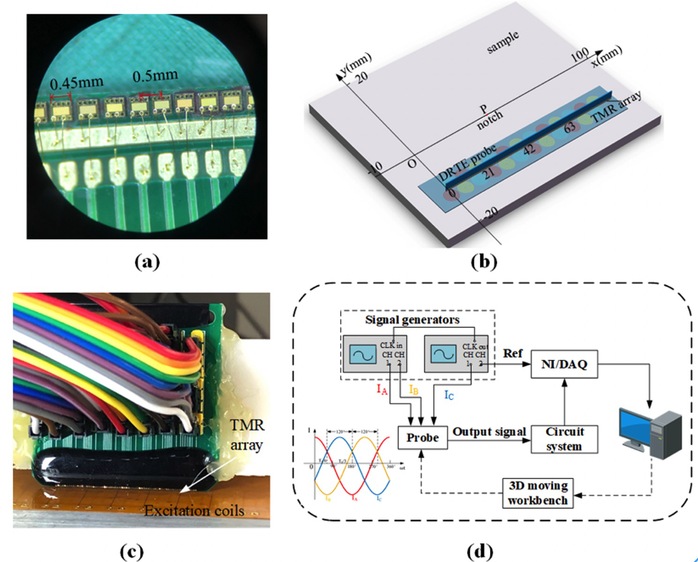
The first result was published in an article entitled “Eddy Current Probe with Three-Phase Excitation and Integrated Array TMR Sensors”. The researchers proposed an eddy current (EC) probe, with three-phase excitation, and integrated array tunnel magnetoresistance (TMR) sensors measuring the magnetic field as receiver. The three-phase excitation currents induce EC that migrates electrically in the material under test. This technique does not require multiplexing of the coils and is sensitive to defects of any orientation, which has merits of lower cost, less noise and simpler circuit compared with conventional excitation methods. The TMR array sensors are customized and packaged in the lab specially for the imaging purpose, and they are capable of generating magnetic field images with high sensitivity and fine spatial resolution (0.5 mm). The group developed a prototype probe with 64 TMR sensors to inspect machined defects and the experimental results showed that the probe can recognize a small defect with dimensions less than 1 mm. By analyzing magnetic field images using artificial neural networks, defects can be accurately localized and quantified.
The first author of this paper was second year PhD candidate Zhang Na, and Prof. Ye Chaofeng was the corresponding author.
Read more at: https://ieeexplore.ieee.org/document/9080544

Figure 1:(a) Photograph of TMR array sensors in the packaging; (b) diagram of the probe with three-phase excitation and TMR array sensors; (c) photograph of the prototype probe; (d) diagram of the experiment setup.
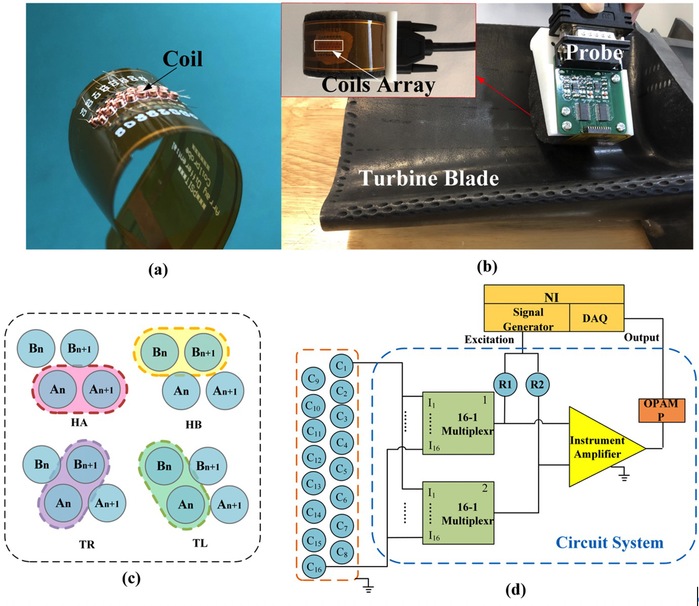
The second research article is entitled “Flexible Array Probe with In-plane Differential Multi-Channels for Inspection of Micro-defects on Curved Surface”, in which a new flexible probe with in-plane differential coils was proposed. It is critical to inspect the potential damage on certain curved surfaces of industrial structures to maintain safe operations. The proposed probe was manufactured to have a flexible configuration so that it can be bent according to different curved surfaces. There were four channels in the proposed probe that complement each other in terms of sensitivity to defects in different orientations, so they can efficiently detect minor defects. A three-dimensional finite-element method model based on the cluster parallel computation was utilized to obtain the defect images, and a prototype probe was then developed and tested by scanning defects on the curved surface of a turbine blade sample. The experimental data showed that defect images with higher resolution (length∗width∗depth =2.5 mm∗0.1 mm∗0.1 mm) can be reliably and quickly identified with this technology, making it the leader in the field of defect detection.
The first author and corresponding author of this work was Prof. Ye Chaofeng.
Read more at: https://ieeexplore.ieee.org/document/9325072

Figure 2:(a) Photograph of the flexible probe during fabrication; (b) inspection of turbine blade sample with the flexible probe; (c) principle of the four channels configuration of the in-plane differential probe; (d) diagram of the experiment setu